
In honour of 10 years of everyone’s favourite accessible design platform, we’re sharing our top 10 tips and tricks for non-designers.
Canva’s simplicity, affordability and ease of use makes it an excellent tool in the belt for business marketing. However, many users don’t have a background in design and are learning on the fly, which means the quality of output suffers. While it’s worth investing in professional graphic design services, Canva definitely has its place – but please use wisely 😉
Here’s our top 10 tricks for beginners looking to harness the power of Canva for business purposes.
1. Use Brand Kits for consistency
Brand Kits are an excellent feature that is available to Canva Pro users. A Brand Kit is a style library of sorts that allows you to define your company logos, colour palette, fonts, and even photography, graphic elements, and icons. Brand Kits streamline the design process and make it easy to create consistent and on-brand designs that will strengthen your brand recognition and trustworthiness. (And earn you brownie points with your marketing team.)
- Consistency is key: Ensure that your designs align with your brand’s visual identity. If you look at a visual overview of your branded materials, does your design feel like part of the family?
2. Be conscious of spacing and alignment

The guidelines are there for a reason! Watch out for spacing and alignment.
Image credit: Imgflip
Paying attention to spacing and alignment will make your designs appear more polished and professional.
- Are elements too close to each other, or the page edge? Use Canva’s built-in page margins to make sure key elements like text aren’t sitting too close to the edge of the page. Allow “breathing room” around elements so they don’t look too crowded.
- Are elements aligned to each other? Consistent alignment and spacing will make your design tidier and more unified. Use the “Position” tool in the top menu bar to easily align elements.
3. Create balanced designs
Learning to create visually balanced designs is a somewhat intuitional skill you’ll pick up over time.
- Do: Use a mix of left and right-aligned elements to help balance each other out. Centred layouts usually look best when everything is centred.
- Don’t: Use a mix of left, right, and centre-aligned elements as this tends to look messy.
4. Keep it simple
Canva is constantly rolling out new features and additional effects, filters and more. But try not to be tempted by all that seems cool and shiny, and always refer to your brand guidelines or Canva Brand Kit. Your friendly local graphic designer is begging you to PLEASE step away from that drop shadow or neon text effect. Simple designs are often the most impactful – and harder to mess up 😉
- Less is more: Stick to a clean design whenever possible, avoid cluttering your designs with unnecessary text or graphics.
- Choose a focal point: Highlight one central element or message in your design to make it stand out. Use colour, size, or positioning to draw attention to this focal point.
5. Typography matters
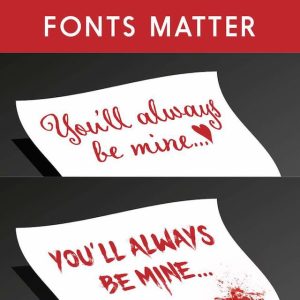
When font selection goes wrong. Stick to your brand fonts, always!
Image credit: Digital Synopsis
Typography can make or break a design.
- Stick to your brand fonts: Always refer to the font styles defined by your brand guidelines and don’t go astray with random fonts, no matter how much you like them!
- Create a clear typographical hierarchy: Use different weights and sizes for headings, subheadings and body text.
- Be mindful of readability: Make sure your text stands out against the background.
6. Keep your project library tidy
I know it’s boring, and we can all be guilty of letting our filing system slide – but keeping your designs organised will really help in the long term! It’s easy for your project library to become cluttered over time. When it’s challenging to find what you need quickly, design consistency can also take a hit.
- Create folders and group designs: I also like to keep related projects – e.g. a series of social posts for one month – all in one design with multiple pages, rather than making a new design each time.
- Use descriptive names for easy searching: Avoid vague titles like “Design 1” or “Untitled”, that’s not going to be helpful later on!
- Be ruthless about archiving and deleting: Archive designs you no longer need but want to be able to retrieve, and delete unused designs to streamline and free up space.
7. Get to know the basic shortcuts
Familiarising yourself with the commonly used shortcuts can do wonders for speeding up your workflow.
- Layers: Canva, like most graphics applications, works in a layering system where elements or groups of elements each sit on their own layer. With multiple overlapping elements on the page, it can become tricky to select and edit specific layers. One of my favourite shortcuts that’s often overlooked is Control + clicking on an element to select the one below. The shortcuts to Send Backward, Send Forward, Send to Back and Send to Front are also very useful.
- Copying elements: Option + clicking and dragging an element will make a copy, while Option + Shift + clicking and dragging an element keeps the copied element snapped in place vertically or horizontally which is great for keeping your design tidy.
- Grouping: Grouping objects together can also make designs easier to manage. Simply use Control + G and Control + Shift + G to group and ungroup.
8. Spell-check is magic
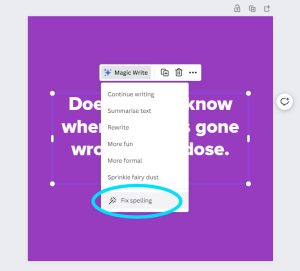
Make the most of Canva’s built-in spell-check feature.
This isn’t Canva-specific, but please, PLEASE keep an eye out for typos and grammatical errors in your designs. A business that consistently puts out content riddled with spelling mistakes comes across unprofessional.
- “Fix spelling” in Canva: This is a built-in spell-check tool offered by Canva. Simply select a text box, click Magic Write, then select “Fix spelling” from the dropdown menu. Abracadabra!
- Even the best magicians need an assistant: Get someone else to double check your design if possible. Sometimes even the most glaring of typos can slip past when you’ve been looking at a design for too long – so getting a second set of eyes is always a good idea.
9. Share and collaborate on your designs
Canva offers some great features for easy collaboration within your organisation or with external contributors (like your marketing/design team).
- Use a collaboration link: Use this to share your design with others. You can set the permissions so the other person can view only, can make comments, or they can edit the design – even those without a Canva account. Learn more about collaboration links here.
- For more advanced users: Teams of 2 or more can enjoy premium Canva features plus even better team collaboration features by upgrading to a Canva for Teams account. Check out the pricing plans here.
10. Learn from Canva’s Design School
Canva offers a library of courses and tutorials ranging from basic design principles to advanced techniques.
- Check out Design School: Click here to explore Canva’s educational resources.
Canva is a versatile and user-friendly design platform that can greatly benefit businesses of all sizes. By following our top tips for beginners and continuing to hone your Canva proficiency, you can create effective designs that strengthen your brand’s image. Happy designing!
If you need further Canva training, help with Canva templates, or would like to level up with professional design services, our experts would love to help. Get in touch with Focused Marketing today.
Recent Comments